
Drawing and Colouring for Kids
From a first little line to a world of color.
83 recorded lessons · Ages 5+ · One purchase for your family
A recorded drawing and coloring course for ages 5 and up. Explore tools, color, composition, light, shadow, pastels and colored-pencil projects.

Eight discoveries. One colorful adventure.
Follow the trail. Choose a discovery to see what your child will explore.
Eight ways to explore the three course worlds. Each step builds on the last.

Drawing tools: their first colorful steps.
Start by getting to know the tools that will travel through the course with your child. The opening lessons introduce pencil grip and control, then show how pastels and colored pencils behave on paper. It is a gentle beginning before the more detailed drawing projects.
- Pencil grip and control
- Getting comfortable with pastels
- Getting started with colored pencils
A peek at the lesson names
02 · Essential drawing and coloring tools for children03 · How to hold and control a pencil04 · Getting started with pastelsMore lessons in this discovery
05 · Getting started with colored pencilsNotice how your child tries holding the pencil and making marks with different materials.
Back to the discovery map ↑
Color theory for kids, one discovery at a time.
Discover primary, secondary and tertiary colors, then see how warm and cool choices change the feeling of a picture. Practical exercises bring these colors together before introducing neutrals, contrast and harmony. Your child returns to the ideas through several applications, building a useful starting point for choosing colors in later projects.
- Color families and the color wheel
- Warm, cool and neutral colors
- Contrast and color harmony
A peek at the lesson names
06 · Discovering primary colors07 · Mixing colors to make secondary colors10 · Understanding warm and cool colorsAsk which colors feel warm, which feel cool, and which your child wants to put together.
Back to the discovery map ↑
Still-life drawing starts with familiar things.
A cup, a jar, a vase of flowers and a fruit basket become friendly subjects to draw. Your child follows the overall shapes and curves, then adds details and color over several lessons. These projects introduce arranging more than one element on a page through familiar objects.
- Looking at shapes and curves
- Arranging a vase and a fruit basket
- Adding details and finishing color
A peek at the lesson names
24 · Drawing a simple cup step by step25 · Drawing a decorative jar step by step26 · Drawing a vase of flowers — Part 1More lessons in this discovery
28 · Drawing a fruit basket — Part 130 · Drawing a fruit basket — Part 3Look for your child noticing curves, comparing shapes and adding their own careful details.
Back to the discovery map ↑
Landscape drawing: build a world on paper.
Draw an old-house scene and a river landscape, developing each from its first shapes to its colors and finishing touches. The next lessons explore the foundations behind a balanced picture: geometric shapes, space, proportion and a ground line. Symmetry and the rule of thirds introduce ways to think about where each element belongs.
- House and river scenes
- Shape, space and proportion
- Symmetry and the rule of thirds
A peek at the lesson names
31 · Drawing an old house scene — Part 135 · Drawing an old house scene — Finishing touches36 · Drawing a river landscape — Part 1Ask where the house sits, how the river moves through the page, and what makes one shape larger than another.
Back to the discovery map ↑
Light and shading bring a drawing to life.
Explore the steps between white and black, tonal value and gentle color gradations. A colored-pencil sphere and pastel apple and pomegranate projects give these ideas a place to practice. A color sketch and a brown monochrome exercise introduce ways to plan a picture and explore several tones of one color.
- Light, dark and tonal value
- Gradation and simple shading
- Color sketches and monochrome
A peek at the lesson names
44 · Understanding tones between black and white45 · Gradation and tonal value — Part 146 · Drawing a sphere with colored pencil gradationsMore lessons in this discovery
47 · Drawing an apple with pastels — Part 149 · Drawing an apple with pastels — Part 350 · Making a color sketch before coloring51 · Coloring with one color: brown monochrome52 · Drawing a pomegranate with pastels — Part 154 · Drawing a pomegranate with pastels — Part 3Invite your child to point to the lightest area and the shadow before adding more color.
Back to the discovery map ↑
Colored pencils and oil pastels: let’s explore.
Follow a pumpkin project in colored pencils, from a geometric outline and tonal foundation to layers of orange, yellow and red. Then explore a jar in oil pastels and another jar in colored pencils. These separate projects show how different materials can build shadows, preserve highlights and develop a picture in stages.
- Layering colored pencils
- Exploring oil pastels
- Keeping highlights while developing shadows
A peek at the lesson names
55 · Drawing a pumpkin with colored pencils — Part 156 · Drawing a pumpkin with colored pencils — Part 258 · Drawing a pumpkin with colored pencils — Part 4Compare how the same kinds of curves, light and shadow can be explored with pencils and pastels.
Back to the discovery map ↑
Drawing from observation: notice the little details.
Which object sits in front, and which peeks out from behind? Overlap lessons and geometric solids make that question visible, while a pastel pear offers another drawing project. A cherry exercise then focuses on correcting spacing, helping your child give the spaces around objects attention as well as the objects themselves.
- Front, back and overlap
- Observing the overall shape
- Reviewing spacing between objects
A peek at the lesson names
65 · Understanding overlap in drawing66 · Drawing overlapping geometric solids — Part 167 · Drawing overlapping geometric solids — Part 2Ask what appears in front and whether a small gap in the picture needs another look.
Back to the discovery map ↑
Complete art projects, one proud little artist.
Two longer still-life projects bring earlier ideas together: four lessons in pastels and nine in colored pencils. Your child follows the composition, first color layers, middle tones, shadows and details through to the finished picture. The colored-pencil project also returns to direct observation, gradual pressure, edges and the space around the objects.
- A complete pastel still life
- A complete colored-pencil still life
- Reviewing details and finishing a picture
A peek at the lesson names
71 · Pastel still life project — Part 173 · Pastel still life project — Part 374 · Pastel still life project — Final partCelebrate the practice, the choices and the finished effort; every child’s pace and result will be different.
Back to the discovery map ↑Small discoveries that build on each other.
More ways to look, choose, try—and make the picture their own.
Get comfortable with drawing tools
Explore how to hold a pencil, use colored pencils and work with oil pastels.
Choose colors with a little more intention
Explore color families, warm and cool palettes, contrast and harmony, then apply them in projects.
Build a picture step by step
Begin with simple shapes, arrange objects and gradually add details and color.
Meet the foundations artists use
Explore proportion, symmetry, the rule of thirds, tonal value and overlap in a child-friendly progression.
Try different ways of developing an artwork
Try a color sketch, a monochrome foundation and gradual colored-pencil layers.
Look carefully, then look again
Notice shapes, relative sizes, light, shadows and the spaces around objects.
Practice finishing a complete picture
Follow longer projects from first marks to details and finishing touches.
Draw still life
Explore cups, jars, flowers, fruit and complete still-life compositions.
Explore landscapes
Develop an old-house scene and a river landscape over several lessons.
Explore what different materials can do
Work across oil-pastel and colored-pencil projects, comparing how each develops color and detail.
Confidence grows through practice. Every child’s pace and finished pictures will be different.

A lot of possibility!
A small art kit is all it takes to begin.
Have these four supplies ready before the first practical activity. Drawing supplies are not included with the course.
HB pencil
For the first shapes and outlines.
12-color colored pencils
For color, layers and the colored-pencil projects.
12-color oil pastels
For the pastel exercises and projects.
Plain white sketchbook, any size
A place for each new drawing and colorful experiment.
How can my child start drawing at home?
Watch the next step
Begin with the recorded lessons on tools and pencil control, then follow the course through colors and drawing projects.
Pause and give it a go
Pause while your child practices on paper. One video can become several short drawing sessions.
Return whenever needed
Replay a section or revisit an earlier idea at your child’s pace.
No live class appointments are needed. The lesson list shows video lengths; practice time varies with each child. An adult can help prepare the supplies and encourage the next small step.
Color. Detail. A picture to be proud of.
A look at artwork from the course gallery. Your child’s work develops with age and practice.
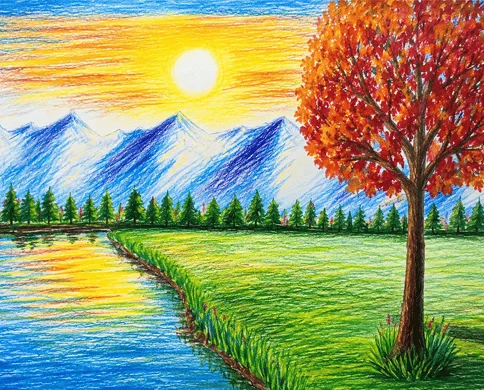
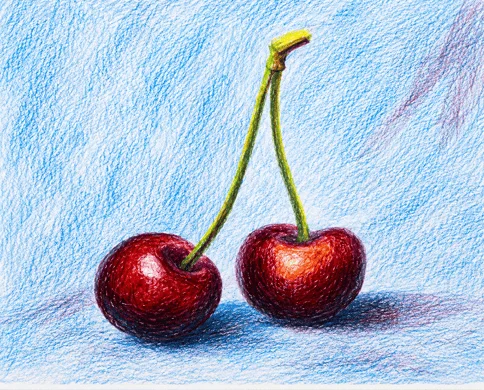
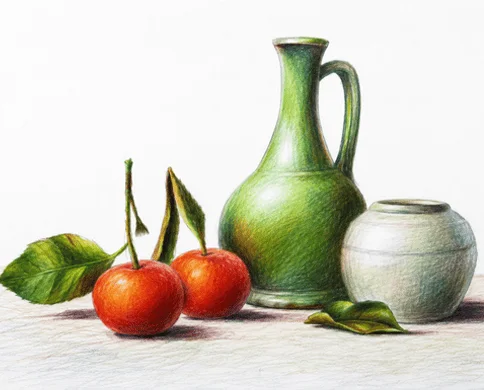
These three artworks are from the course gallery. The fantasy scenes elsewhere on this page are AI-created illustrations, separate from the course artwork.
Every lesson. Ready to explore.
From first lines to a picture they can proudly call their own.
Color Kingdom
Make friends with colors, tools, and your very first lines.
- 01
Introduction to drawing and coloring for children
Your child gets a simple, engaging introduction to the course and discovers what they will learn on their drawing and coloring journey.
Duration: - 02
Essential drawing and coloring tools for children
Your child explores the tools needed for the course and learns how to use them correctly and safely.
Duration: - 03
How to hold and control a pencil
Your child learns how to hold a pencil correctly to draw clearer lines with better control.
Duration: - 04
Getting started with pastels
Your child learns how to handle and use pastels to create soft, beautiful color.
Duration: - 05
Getting started with colored pencils
Your child learns how to use colored pencils for neat coloring and clearer results.
Duration: - 06
Discovering primary colors
Your child learns about primary colors and their importance as a starting point for understanding color.
Duration: - 07
Mixing colors to make secondary colors
Your child discovers how to mix primary colors to create new colors.
Duration: - 08
Understanding the secondary color wheel
Your child explores the secondary color wheel and how it helps them choose suitable colors.
Duration: - 09
Practicing with secondary colors
Your child puts their knowledge of secondary colors into practice through a fun exercise.
Duration: - 10
Understanding warm and cool colors
Your child learns the difference between warm and cool colors and how each affects the appearance of a picture.
Duration: - 11
Practicing with warm colors
Your child draws using only warm colors to explore how they create a sense of warmth and energy.
Duration: - 12
Practicing with cool colors
Your child practices using cool colors to create a calm, harmonious picture.
Duration: - 13
Further practice with cool colors
Your child continues using cool colors in a new exercise that develops their understanding of coloring.
Duration: - 14
Combining warm and cool colors — Part 1
Your child learns how to combine warm and cool colors in one picture.
Duration: - 15
Combining warm and cool colors — Part 2
Your child practices balancing different colors to create a more harmonious result.
Duration: - 16
Combining warm and cool colors — Part 3
Your child practices using color contrast to make elements in a picture stand out.
Duration: - 17
Combining warm and cool colors — Final exercise
Your child completes an exercise that brings warm and cool colors together with greater confidence.
Duration: - 18
Discovering neutral colors and their uses
Your child explores neutral colors and how they calm a picture and help other colors stand out.
Duration: - 19
Understanding contrast in coloring
Your child learns how contrast makes elements in a picture clearer and more eye-catching.
Duration: - 20
Using grays and browns
Your child explores the beauty of muted colors and how they add depth and realism to a drawing.
Duration: - 21
Understanding color harmony
Your child learns to choose colors that work well together to create a pleasing, beautiful picture.
Duration: - 22
The tertiary color wheel — Part 1
Your child begins exploring tertiary colors and how they are made by mixing colors.
Duration: - 23
The tertiary color wheel — Part 2
Your child continues exploring the tertiary color wheel and using it to choose colors.
Duration:
Sketch Valley
Follow simple steps. Watch a little drawing grow.
- 24
Drawing a simple cup step by step
Your child learns to draw a cup by observing its overall shape and basic lines.
Duration: - 25
Drawing a decorative jar step by step
Your child practices drawing a jar and explores its shape and curves in a simple way.
Duration: - 26
Drawing a vase of flowers — Part 1
Your child begins drawing a vase of flowers and learns to arrange elements within a picture.
Duration: - 27
Drawing a vase of flowers — Part 2
Your child finishes the vase drawing by adding details and color to make the picture more beautiful.
Duration: - 28
Drawing a fruit basket — Part 1
Your child begins drawing a fruit basket and learns to arrange shapes within the composition.
Duration: - 29
Drawing a fruit basket — Part 2
Your child adds more detail to the fruit and basket while refining the drawing.
Duration: - 30
Drawing a fruit basket — Part 3
Your child completes the fruit basket picture with color and finishing touches.
Duration: - 31
Drawing an old house scene — Part 1
Your child begins drawing the overall shape of an old house within a simple scene.
Duration: - 32
Drawing an old house scene — Part 2
Your child adds details to the house, including windows, walls, and basic lines.
Duration: - 33
Drawing an old house scene — Part 3
Your child learns to add elements around the house to make the scene more complete.
Duration: - 34
Drawing an old house scene — Part 4
Your child begins coloring the house and its surroundings using colors that work well together.
Duration: - 35
Drawing an old house scene — Finishing touches
Your child completes the old house picture by adding details and simple shadows.
Duration: - 36
Drawing a river landscape — Part 1
Your child begins drawing a river within a landscape in an easy, enjoyable way.
Duration: - 37
Drawing a river landscape — Part 2
Your child completes the river picture by adding color and final details.
Duration: - 38
Geometric shapes in drawing — Part 1
Your child learns to recognize geometric shapes in the objects around them.
Duration: - 39
Geometric shapes in drawing — Part 2
Your child continues turning simple shapes into clear, recognizable drawings.
Duration: - 40
Understanding space and arranging elements in a picture
Your child explores the importance of space and how it helps with arranging elements in a drawing.
Duration: - 41
The basics of proportion in drawing
Your child learns to compare the sizes of different elements so the picture looks balanced.
Duration: - 42
Using a ground line in drawing
Your child learns how a ground line helps anchor elements within a picture.
Duration: - 43
Symmetry and the rule of thirds in composition
Your child explores visual balance through symmetry and the rule of thirds.
Duration:
Masterpiece Castle
Bring your discoveries together in colorful art projects.
- 44
Understanding tones between black and white
Your child learns to observe light and dark tones before moving on to coloring.
Duration: - 45
Gradation and tonal value — Part 1
Your child learns how tonal value affects depth and clarity in a drawing.
Duration: - 46
Drawing a sphere with colored pencil gradations
Your child learns to draw a sphere and color it using shading and gradations with colored pencils.
Duration: - 47
Drawing an apple with pastels — Part 1
Your child begins drawing an apple and explores its shape from a different angle.
Duration: - 48
Drawing an apple with pastels — Part 2
Your child practices coloring the apple with pastels and adding different tones.
Duration: - 49
Drawing an apple with pastels — Part 3
Your child completes the apple by adding shadows and finishing touches.
Duration: - 50
Making a color sketch before coloring
Your child learns to make a color sketch to try out colors before creating the picture.
Duration: - 51
Coloring with one color: brown monochrome
Your child learns to use different tones of one color to create a harmonious picture.
Duration: - 52
Drawing a pomegranate with pastels — Part 1
Your child begins drawing the shape of a pomegranate and identifying its main details.
Duration: - 53
Drawing a pomegranate with pastels — Part 2
Your child practices coloring the pomegranate with pastels and bringing out different tones.
Duration: - 54
Drawing a pomegranate with pastels — Part 3
Your child completes the pomegranate by adding shadows and final details.
Duration: - 55
Drawing a pumpkin with colored pencils — Part 1
Your child begins the colored-pencil pumpkin with a simple geometric outline and guides for its sections.
Duration: - 56
Drawing a pumpkin with colored pencils — Part 2
Your child identifies the pumpkin’s shadows and middle tones, building them gradually with controlled pencil pressure.
Duration: - 57
Drawing a pumpkin with colored pencils — Part 3
Your child strengthens the shadows in the monochrome foundation before adding color.
Duration: - 58
Drawing a pumpkin with colored pencils — Part 4
Your child layers orange and yellow on the pumpkin while preserving its highlights.
Duration: - 59
Drawing a pumpkin with colored pencils — Part 5
Your child finishes the pumpkin with red and complementary colors to develop depth and detail.
Duration: - 60
Drawing a jar with oil pastels — Part 1
Your child begins an oil-pastel jar within a rectangular guide, simplifying its curves into lines and shapes.
Duration: - 61
Drawing a jar with oil pastels — Part 2
Your child completes the oil-pastel jar, adding background colors and shadows while retaining the highlights.
Duration: - 62
Drawing a jar with colored pencils — Part 1
Your child begins a new jar with colored pencils, using rectangles and triangles to establish its proportions.
Duration: - 63
Drawing a jar with colored pencils — Part 2
Your child builds the jar’s shadows with colored pencils while leaving the lightest areas white.
Duration: - 64
Drawing a jar with colored pencils — Part 3
Your child completes the jar with layers of yellow, red and darker colors while preserving its light and shadow.
Duration: - 65
Understanding overlap in drawing
Your child learns how some elements appear in front of others within a picture.
Duration: - 66
Drawing overlapping geometric solids — Part 1
Your child begins practicing overlap with simple geometric shapes.
Duration: - 67
Drawing overlapping geometric solids — Part 2
Your child continues arranging geometric solids in front of and behind one another correctly.
Duration: - 68
Drawing a pear with pastels — Part 1
Your child begins drawing and coloring a pear with pastels while exploring its overall shape.
Duration: - 69
Drawing a pear with pastels — Part 2
Your child completes the pear drawing by adding shadows and final details.
Duration: - 70
Improving spacing by drawing cherries
Your child learns to improve the use of space within a picture through a cherry-drawing exercise.
Duration: - 71
Pastel still life project — Part 1
Your child begins their final pastel project by drawing the basic composition.
Duration: - 72
Pastel still life project — Part 2
Your child applies the first layers of color and begins developing the picture.
Duration: - 73
Pastel still life project — Part 3
Your child learns to add shadows and gradations to bring out depth in the picture.
Duration: - 74
Pastel still life project — Final part
Your child completes the pastel picture with details and finishing touches.
Duration: - 75
Colored pencil still life project — Part 1
Your child starts the final still-life project from observation, placing its objects and outlines without a tracing overlay.
Duration: - 76
Colored pencil still life project — Part 2
Your child marks the composition’s shadows and refines its curves while preserving the highlights.
Duration: - 77
Colored pencil still life project — Part 3
Your child develops the colored-pencil foundation across the whole picture with light, gradual pressure.
Duration: - 78
Colored pencil still life project — Part 4
Your child refines middle tones, shadows and leaf shapes while keeping the light areas clear.
Duration: - 79
Colored pencil still life project — Part 5
Your child layers green over the brown foundation and varies the leaf colors with yellow and orange.
Duration: - 80
Colored pencil still life project — Part 6
Your child continues the leaves with light layers, observing the colors that develop over the brown foundation.
Duration: - 81
Colored pencil still life project — Part 7
Your child develops the picture with red, yellow and blue layers and deepens the darkest areas.
Duration: - 82
Colored pencil still life project — Part 8
Your child refines the objects’ edges and shadows and reviews their balance with the surrounding space.
Duration: - 83
Colored pencil still life project — The finished picture
Your child adds the final highlights, shadows and details to complete the still-life project.
Duration:
Their name. Their proud moment.
Celebrate finishing the course with a personalized certificate, available on request after completion.
Take a peek at the certificate